在网上搜一搜有关aria的文章,大多数都是如何利用aria配合BaiduExporter下载百度盘,但有关aria2的其他使用方法很少涉及。
这里我把自己使用aria2的一些经验介绍一下,主要讲解webUI服务器的搭建,以及使用FlashGot调用aria2rpc下载文件,东西不多,希望能对你有帮助。
由于本人使用的系统是Archlinux,大部分的操作也是基于此,大家应根据各自情况灵活调整。
网上已教程中不断重复的部分,我就不再赘述了,本文主要讲之前教程中没有提到的部分。
- TOC
安装aria 2
$ sudo pacman -S aria2
一行命令解决。
其他平台的可以参考以下教程。
macOS: http://www.jianshu.com/p/e5e56a1d25a3
windows: https://github.com/acgotaku/BaiduExporter/tree/master/aria2c
配置aria 2
主要参考man aria2c,根据里头的选项自己写了一个配置文件。
如果觉得麻烦,可以参考BaiduExporter提供的配置文件,自己略作修改就可以了。
特别提醒1
aria2的默认配置文件位于$HOME/.aria2/aria2.conf,一定要保证aria2 rpc的配置文件不是默认位置,否则的话,在本机直接运行aria2c命令会无法下载文件。
建议将aria2 rpc的配置文件单独放置,启动时配合--conf-path参数,如$ aria2c --conf-path ~/.aria2/aria2_daemon.conf。
特别提醒2
为了安全起见,一定要设置验证方式,即rpc-secret,rpc-user、rpc-passwd不建议使用。
另为安全起见,建议设置长token,如rpc-secret=Gzq6HaPhDCU7l5zEIXqVNypTuZmhktrkJvTB52CFetjWrpL3IxmRBINpMk5DWNN1。
安装webui(非必须)
这步并非必须,可以直接使用在线的webui,比如说 http://ziahamza.github.io/webui-aria2/,我自己在本地安装了一个,步骤并不复杂,简要的说一说。
安装步骤
1. 下载webui文件
$ git clone https://github.com/ziahamza/webui-aria2.git
如果没有git命令,可以直接访问webui-aria2页面,点击Clone or download按钮,然后再点击Download ZIP按钮下载。
2. 修改配置参数
进入webui-aria2目录,编辑configuration.js文件,修改里面的配置参数。
默认的configuration.js可以看这个链接。
虽然每个选项后都有英文注释,为了方便大家理解,我这里配图解释一下每个参数的意思吧。
webui的界面总体如下。
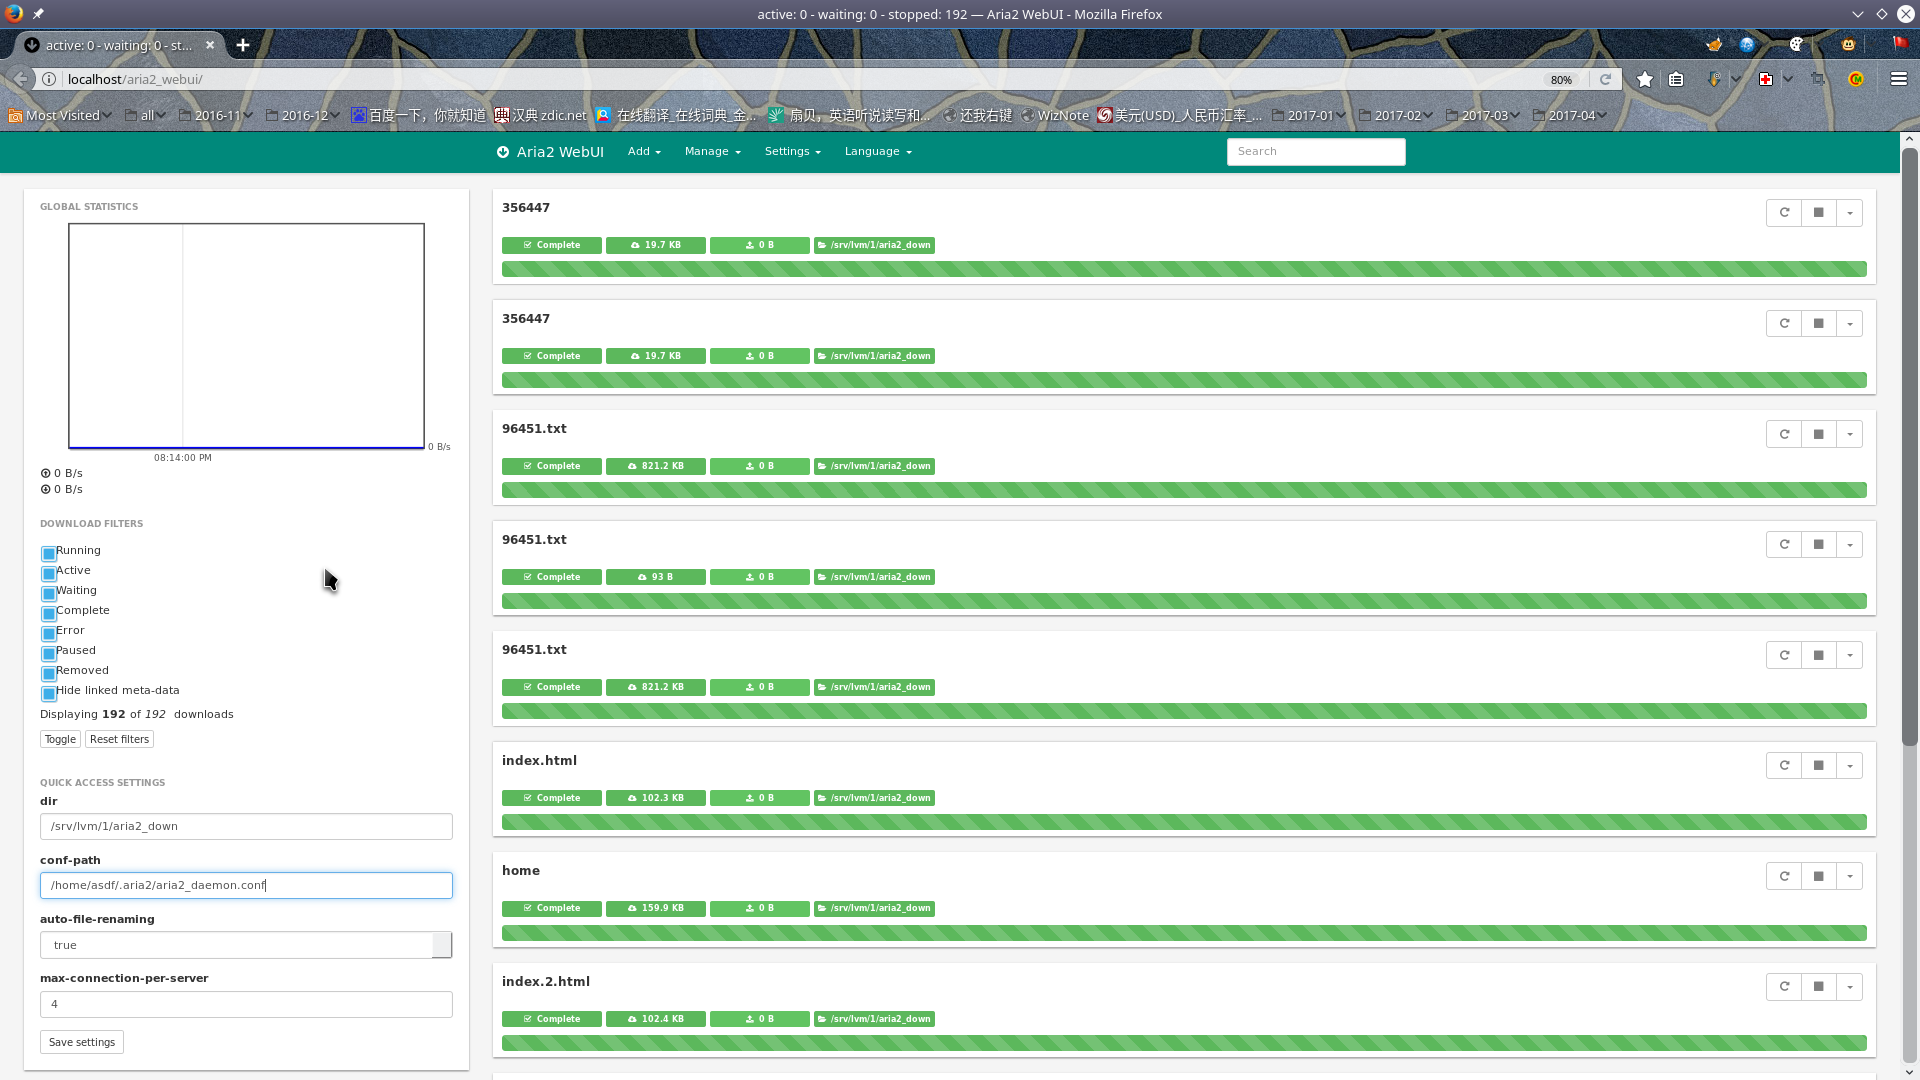
下面配合图片讲解各个参数的功用。
name
.constant('$name', 'Aria2 WebUI') // name used across the entire UI
最上方浏览器标题栏中的Aria2 WebUI,可自行修改。
titlePattern
.constant('$titlePattern', 'active: {active} - waiting: {waiting} - stopped: {stopped} — {name}')
还是浏览器标题栏,Aria2 WebUI前头的active: 0 - waiting: 0 - stopped: 5,可以自行修改。
pageSize
.constant('$pageSize', 11) // number of downloads shown before pagination kicks in
每页最多显示多少个下载项目,默认11个。
authconf
.constant('$authconf', {           // default authentication configuration, never fill it in case the webui is hosted in public IP as it can be compromised
  host: location.protocol.startsWith('http') ? location.hostname : 'localhost',
  path: '/jsonrpc',
  port: 6800,
  encrypt: false,
  auth: {                          // either add the token field or the user and pass field, not both.
  // token: '$YOUR_SECRET_TOKEN$'
  /*-----------------------------*/
  // user: '*YOUR_USERNAME*',
  // pass: '*YOUR_SECRET_PASS*'
  },
  directURL: ''                   // If supplied, links will be created to enable direct download from the aria2 server, requires appropriate webserver to be configured
})
服务器连接参数,重要的配置参数,是界面Settings选项卡中Connection Settings的默认配置结果。
 文件里的参数和界面是一一对应的,参照页面填好本节参数就ok了。
enable
.constant('$enable', {

  torrent: true,  // bittorrent support only enabled if supported by aria2 build, set to false otherwise to permanently disable it

  metalink: true, // metalink support only enabled if supported by aria2 build, set to false to permanently disable it

  sidebar: {            // configuration related to the sidebar next to the list of downloads
    show: true,         // set to false to completely hide the sidebar. Other elements inside will be automatically hidden

    stats: true,        // set to false to hide the global statistic section (contains the speed graph for now)

    filters: true,      // set to false to hide the  Download Filters

    starredProps: true // only shown when at least one property is added to the starred list, set to false to permanently hide the Quick Access Settings inside the sidebar
  }
})
torrent、metalink:是否允许在webUI上下载种子、磁力链。默认值为true,如需禁用把相应的值改为false就行了。
sidebar是有关侧边栏组件的配置。show:是否显示侧边栏,默认值为true。stats、filters、starredProps:可以参考上面的总体界面的图片,左边部分从上到下,一次为Global Statistics、Download Filters、Quick Access Settings,与这三个选项为一一对应的关系,需要隐藏哪一个板块,把相应的值修改为false就行了。
starredProps
.constant('$starredProps', [   // default list of Quick Access Properties. Can be overridden by making modification through the Global Settings dialog
  // go to Global Settings dialog to see their description
  'dir', 'conf-path', 'auto-file-renaming', 'max-connection-per-server'
])
总体界面左下角的部分,通过这个部分可以快速修改一些配置值。默认配置值的名称是'dir', 'conf-path', 'auto-file-renaming', 'max-connection-per-server',可以自行修改。
配置值名称可以参考man aria2c。
我个人此项的值是'dir', 'max-concurrent-downloads', 'max-connection-per-server', 'max-overall-download-limit', 'max-download-limit', 'max-overall-upload-limit', 'max-upload-limit',大家可以参考使用。
downloadProps
.constant('$downloadProps', [ // Similar to starred Quick Access properties but for adding new downloads.
  // go to Advance Download Options when adding a new download to view the list of possible options
  'header', 'http-user', 'http-passwd', 'pause', 'dir', 'max-connection-per-server'
])
打开Add选项卡下的选项后,Download settings部分。
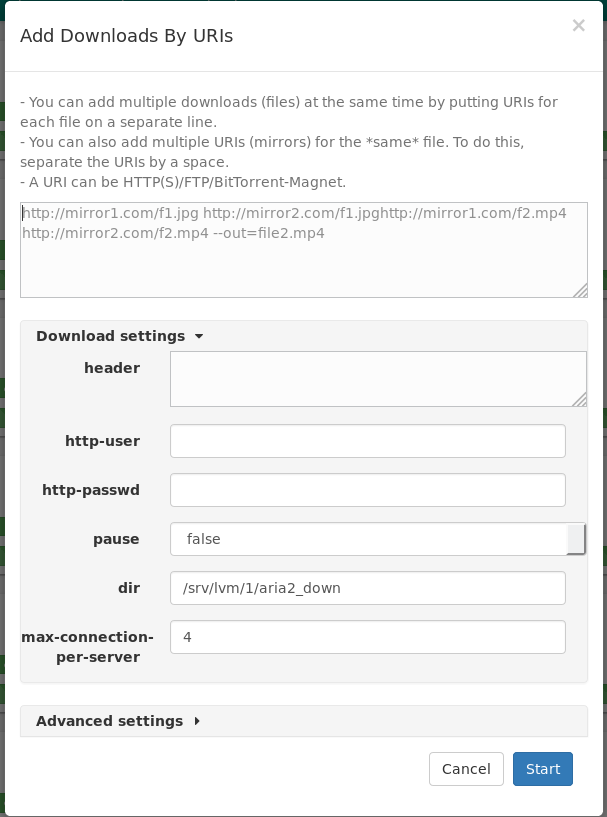
与starredProps相似。
globalTimeout
.constant('$globalTimeout', 1000) // interval to update the individual downloads
更新频率,默认1000ms。
2.5 两种选择
修改完配置文件后,有两种选择。
选择一:
直接双击index.html文件,打开浏览器,即可使用。
简单易行,方便快捷,推荐使用。
选择二:
安装一个http服务器,把这个网页运行起来。
简单的,直接使用python -m http.server即可。
如果要长期运行建议安装apache。
3. 安装apache
$ sudo pacman -S apache
apache使用默认配置就可以了。
4. 复制文件
进入webui-aria2目录,运行以下命令。
$ sudo mkdir /srv/http/aria2_webui/
$ sudo cp -r * /srv/http/aria2_webui/
$ sudo chown http:http -R /srv/http/aria2_webui/
5. 启动apache服务
$ sudo systemctl enable httpd.service
$ sudo systemctl start httpd.service
至此一个webUI搭建完成。
在本机,你可以访问 http://localhost/aria2_webui/,测试体验。
如果从其他机器,则需要开放相应端口(80),使用ip或域名访问。
通过FlashGot使用aria2rpc
FlashGot是一个火狐插件,通过这个插件,你可以调用本机的多个外部程序完成下载过程。
下面介绍如何使用FlashGot调用aria2rpc完成下载。
我弄完了才发现一个比较简单的方案,我的方案相对复杂了一点,大家可以从两个方案里头选一个使用。
下面介绍我的方案
安装FlashGot
使用Firefox打开https://addons.mozilla.org/en-US/firefox/addon/flashgot/,安装插件。
寻找aria2rpc文件
如果你安装了aria2,应该能够在/usr/share/doc/aria2/xmlrpc/aria2rpc寻找到一个ruby脚本。如果没有可以在此下载。
特别提醒,使用aria2rpc脚本需要安装ruby,sudo pacman -S ruby即可。
创建中间脚本
由于直接使用前文的aria2rpc脚本,在有Cookie的情况下,有时会下载失败。 而FlashGot参数模板中不允许引号(" ' `)存在,所以需要一个中间脚本转换一下参数,为其加上引号。
脚本如下:
#!/bin/bash

Aria2rpc_path="/usr/share/doc/aria2/xmlrpc/aria2rpc"
Logfile="/tmp/aria2rpc.log"
date >> $Logfile
# Uri
if [ "$(echo $@ | grep "addUri")" != "" ];then
Parm=$(echo "$@" | sed -e "s/addUri /addUri \"/g" -e "s/ --secret/\" --secret/g")
fi
# Cookie
if [ "$(echo $@ | grep "Cookie")" != "" ];then
Parm=$(echo "$Parm" | sed -e "s/Cookie:/\"Cookie:/g" -e "s/$/\"/g")
fi
# referfer
if [ "$(echo $@ | grep "\-\-referer")" != "" ];then
Parm=$(echo "$Parm" | sed -e "s/--referer /--referer \"/g" -e "s/ --server/\" --server/g")
fi
# user-agent
if [ "$(echo $@ | grep "\-\-user-agent")" != "" ];then
Parm=$(echo "$Parm" | sed -e "s/--user-agent /--user-agent \"/g" -e "s/ --port/\" --port/g")
fi

echo "ruby $Aria2rpc_path $Parm" >> $Logfile
bash -c "ruby $Aria2rpc_path $Parm" >> $Logfile
Aria2rpc_path是aria2rpc脚本路径,根据实际情况修改。Logfile是日志文件路径,如果无需日志,填入/dev/null即可。
不要忘记赋予中间脚本可执行权限。
$ chmod +x aria2rpc.sh
在FlashGot中添加相应方案
基本步骤:
- 打开FlashGot配置菜单
- 在第一个选项卡(General)中,点击
Add按钮 - 输入方案名称,自订
- 选择中间脚本(前文中的脚本)
- 在中间文本框中(Command line arguments template)添加参数模板
- 测试
参数模板:
[addUri URL] --secret token [--referer REFERER] --server localhost [--user-agent UA] --port 6800 [--header Cookie: COOKIE]
--secret token中:token为aria2配置文件中rpc-secret值--server localhost:服务器地址。根据实际情况修改,如为本机,保持默认即可。--port 6800:服务器端口。根据实际情况修改。
一切完成后,下载一个需要验证Cookie的文件,测试能否正常工作。
